What are nupps?
Echo Flower by Jenny Johnson Johnen
Evelyn Clark's Swallowtail
Funky Summit Shawl - are those snakes or circles?
That Peacock Shawl by Gail Nightsong.
Canary Knits Wishlist - Aeolian and Laminaria are pretty.
Torreyana Shawl
Shawl Yarns To Consider:
Tanis Fiber Arts Pink Label
Showing posts with label knitting. Show all posts
Showing posts with label knitting. Show all posts
Tuesday, October 4, 2011

Thursday, September 15, 2011
Yarn Stores
Artfibers - They are back in the city on Sutter near Grant!
266 Sutter St., third floor (elevator)
San Francisco CA 94108
Phone: 415.956.6319
Toll Free: (888) 326-1112
Hours: Tuesday through Sunday: 11-6 closed Monday
http://www.artfibers.com
Jimmy Beans Wool - excellent online service; Panda Silk available
5000 Smithridge Drive #A11, Reno NV 89502
Phone (775)827-YARN (9276)
Toll Free (877) JBW-KNIT (529-5648)
http://www.jimmybeanswool.com
Atelier Yarns
1945 Divisadero St
San Francisco, CA 94115-2518
(415) 771-1550
http://www.atelieryarns.com/
Imagiknit - massive selection
3897 18th St. (at Sanchez)
San Francisco, CA 94114
(415) 621-6642
Monday-Saturday 11-6:30, Sunday 11-4
http://www.imagiknit.com/
PURL
137 Sullivan Street
New York, NY 10012
phone: (212)420-8796
(212) 420-8798
Monday through Friday 12-7;
Saturday and Sunday 12-6
http://www.purlsoho.com/purl
266 Sutter St., third floor (elevator)
San Francisco CA 94108
Phone: 415.956.6319
Toll Free: (888) 326-1112
Hours: Tuesday through Sunday: 11-6 closed Monday
http://www.artfibers.com
Jimmy Beans Wool - excellent online service; Panda Silk available
5000 Smithridge Drive #A11, Reno NV 89502
Phone (775)827-YARN (9276)
Toll Free (877) JBW-KNIT (529-5648)
http://www.jimmybeanswool.com
Atelier Yarns
1945 Divisadero St
San Francisco, CA 94115-2518
(415) 771-1550
http://www.atelieryarns.com/
Imagiknit - massive selection
3897 18th St. (at Sanchez)
San Francisco, CA 94114
(415) 621-6642
Monday-Saturday 11-6:30, Sunday 11-4
http://www.imagiknit.com/
PURL
137 Sullivan Street
New York, NY 10012
phone: (212)420-8796
(212) 420-8798
Monday through Friday 12-7;
Saturday and Sunday 12-6
http://www.purlsoho.com/purl
Tuesday, July 19, 2011
Claire-Anne O'Brien
At the complete opposite end of the scale from Petit Tricotage, we have Claire-Anne O'Brien's jumbo knits:
Knit Stools
British Wool Chair
From her website:
Knit Stools
British Wool Chair
From her website:
"... Her work plays with technique and scale creating playful and tactile fabrics for interiors. This sculptural approach to textiles brings fabrics to life in three dimensions through form exploration and furniture."
Friday, May 20, 2011
Yarn Stores
Jimmy Beans Wool - excellent online service; Panda Silk available
5000 Smithridge Drive #A11, Reno NV 89502
Phone (775)827-YARN (9276)
Toll Free (877)JBW-KNIT (529-5648)
http://www.jimmybeanswool.com
Atelier Yarns
1945 Divisadero St
San Francisco, CA 94115-2518
(415) 771-1550
http://www.atelieryarns.com/
Imagiknit
3897 18th St. (at Sanchez)
San Francisco, CA 94114
(415) 621-6642
Monday-Saturday 11-6:30, Sunday 11-4
http://www.imagiknit.com/
PURL
137 Sullivan Street
New York, NY 10012
phone: (212)420-8796
(212) 420-8798
Monday through Friday 12-7;
Saturday and Sunday 12-6
http://www.purlsoho.com/purl
5000 Smithridge Drive #A11, Reno NV 89502
Phone (775)827-YARN (9276)
Toll Free (877)JBW-KNIT (529-5648)
http://www.jimmybeanswool.com
Atelier Yarns
1945 Divisadero St
San Francisco, CA 94115-2518
(415) 771-1550
http://www.atelieryarns.com/
Imagiknit
3897 18th St. (at Sanchez)
San Francisco, CA 94114
(415) 621-6642
Monday-Saturday 11-6:30, Sunday 11-4
http://www.imagiknit.com/
PURL
137 Sullivan Street
New York, NY 10012
phone: (212)420-8796
(212) 420-8798
Monday through Friday 12-7;
Saturday and Sunday 12-6
http://www.purlsoho.com/purl
Monday, May 9, 2011
Crochet: Raffia
Where it all started.
Fayme Harper's video tutorial - she also covers shaping and dyeing
Crochet Asylum's raffia
Fayme Harper's video tutorial - she also covers shaping and dyeing
Crochet Asylum's raffia
Wednesday, April 27, 2011
Wednesday, December 1, 2010
Baskets: Vietnamese Rice Baskets

While looking for such a basket, I stumbled upon Lantern Moon's even lovelier, to my eyes anyway, rice baskets from Vietnam. I decided to give the smallest one a try and, continuing the cautious streak, ordered a plain one.
It has since arrived and been in constant use. It is lightweight but strong and despite being the smallest one holds quite a lot: one almost complete TSJ (i.e., Toddler Suprise Jacket), two balls of yarn, the pattern, three magazines, and occasionally an ipod or even some toys. It is very pliable but keeps a nice, deep upright shape so your goods do not spill out and roll away.
Another perk is that, like a Transformer, the upper portion with the handles can tuck down into the bottom half so that it can be stored stacked, or filled like a bowl. This made me love it even more. I am trying to justify a second one!
I am sure they would be great for holding so many other things!
Wednesday, May 26, 2010
Slinky I Cord
I cords are so useful.
I recently made some for a Mdvanii sheath and came up with a method to make them a little softer and slinkier and more suitable for a 1:6 strap.
Cast on 2 stitches.
Slip first stitch, knit second stitch.
Turn work.
Slip first stitch purlwise, purl second stitch.
Turn work.
Repeat ad nauseum.
(Originally posted at Petit Tricotage.)
I recently made some for a Mdvanii sheath and came up with a method to make them a little softer and slinkier and more suitable for a 1:6 strap.
Cast on 2 stitches.
Slip first stitch, knit second stitch.
Turn work.
Slip first stitch purlwise, purl second stitch.
Turn work.
Repeat ad nauseum.
(Originally posted at Petit Tricotage.)
Wednesday, May 12, 2010
Tentacles, Part I
So blame it on my trawling around Flickr, Etsy, and the usual haunts but I have reinvigorated my enthusiasm for cephalopods and other tentacled creatures.
Check out the work by Wunderkammer. I like that she stays true to life without getting all Disney/Cutesey/Anime. This means, essentially, that the eyes are in the right place and not necessarily in the best place for a cartoon franchise. But the name, crocheted Cuddlefish (for Cuttlefish), does make me smile. I must add the pattern to my archive.
Dooptheory has some exquisite little octopi and squids.
I am so tempted to buy one but haven't come up with a solid justification just yet. Her design is her own and very cute while not straying far from reality. I am so tempted to commission a red, red, red one.

Image by Dooptheory
Partly to blame for my renewed interest is stumbling across Tokkyu2222 Takoyama.
His Octopi are exquisite and BIG.
When I am rich(er), I would like to commission him to do one.

Image by Tokyo2222
And while not cephalopods, Ugly Gerbil's Cthulhu Babies do have tentacles galore. I find their single, glaring eye irresistable. I confess that a red one is in the mail.
Check out the work by Wunderkammer. I like that she stays true to life without getting all Disney/Cutesey/Anime. This means, essentially, that the eyes are in the right place and not necessarily in the best place for a cartoon franchise. But the name, crocheted Cuddlefish (for Cuttlefish), does make me smile. I must add the pattern to my archive.
Dooptheory has some exquisite little octopi and squids.
I am so tempted to buy one but haven't come up with a solid justification just yet. Her design is her own and very cute while not straying far from reality. I am so tempted to commission a red, red, red one.

Partly to blame for my renewed interest is stumbling across Tokkyu2222 Takoyama.
His Octopi are exquisite and BIG.
When I am rich(er), I would like to commission him to do one.

And while not cephalopods, Ugly Gerbil's Cthulhu Babies do have tentacles galore. I find their single, glaring eye irresistable. I confess that a red one is in the mail.
Tuesday, March 9, 2010
Blocking
Flexible Interlocking Tiles by Coco Knits and at KnitPicks
EZ Blocking Boards, Large Format Bi-fold Format
Wondermat, a thrifty alternative
EZ Blocking Boards, Large Format Bi-fold Format
Wondermat, a thrifty alternative
Tuesday, December 29, 2009
Seamless Intarsia
From Let Me Explaiknit.
The other method makes the joins where two of the color blocks meet, and is done by linking one yarn around the other as with flat intarsia, but with some changes because the yarn to wrap around isn't on the correct side yet. It has the disadvantage of having a slightly higher potential for getting tangled up in your work, and the advantage of being quite seamless; I definitely prefer this method. We'll continue using our smiley-face hat example; we'll need one strand each of yellow and blue, because in a seamless hat, there is one section of each color. On the first row which contains the motif, you will work with the blue strand to the right edge of the motif, then twist the yarns as usual and work the motif with the yellow strand. Now, having reached the left edge of the motif, you need to wrap the yellow yarn and blue yarn together, but the blue yarn is still back over on the right edge. What you're going to do is bring the blue yarn all the way around counterclockwise in a very long strand, and lay it over the yellow yarn; don't worry about the length of this very long strand, because we're going to take care of it in a minute. Once you've laid the blue yarn over the yellow, work counterclockwise with the yellow until you're back on the right edge of the motif. Drop the yellow strand inside the loop of blue yarn that you created in the previous step, and then use that blue strand to continue working counterclockwise through the entire blue section; pull out slack from where the end of the strand is caught by the yellow as needed. When you've completed the blue section and are at the left edge of the yellow motif, pull the blue strand taut, so there's no more slack in it and it's snug up against the yellow section. At this point, the blue strand is at the left edge of the motif, and the yellow strand is at the right edge. Draw the yellow strand loosely across the back of the yellow section, and lay it over the blue strand, and then work clockwise with the blue strand until you're back to the right edge of the motif. Drop the blue strand through the loop of yellow, work the yellow stitches clockwise, and then pull the yellow strand taut. As you can see, you're essentially working flat, with the turning point at the left edge of the motif (a brief note: if you have more than one motif, as when you put a design on the front and another design on the back of an item, the join point will end up at the left edge of the last-worked motif), but the left edge of the motif and the right edge of the background section are being linked together in exactly the same way that the other edges are; this gives you an effectively seamless tube. At the top of the motif, if the last row of the motif was counterclockwise, the yellow yarn will be at the right edge; do not draw it across the back, but simply do a YO with the blue yarn and resume working clockwise in rounds, using SSK to work that YO together with the stitch before it on the next round. If the last row of the motif was clockwise, slip the motif stitches in the counterclockwise direction to get back to the right edge of the motif, and then simply pick up the blue strand and resume working clockwise in rounds.
Thursday, August 20, 2009

Tuesday, August 18, 2009
Sunday, August 16, 2009
Daisy Stitch
DAISY STITCH
Cast on a multiple of 4 stitches, plus one.
Row 1 (right side): Knit. Row 2: K1, *P3tog, yo, P3tog again (the same three stitches as before), K1, repeat from *. Row 3: Knit. Row 4: K1, P1, K1, *P3tog, yo, P3tog again (the same three stitches as before), K1, repeat from *.
Repeat Rows 1 - 4.
Cast on a multiple of 4 stitches, plus one.
Row 1 (right side): Knit. Row 2: K1, *P3tog, yo, P3tog again (the same three stitches as before), K1, repeat from *. Row 3: Knit. Row 4: K1, P1, K1, *P3tog, yo, P3tog again (the same three stitches as before), K1, repeat from *.
Repeat Rows 1 - 4.
Sunday, August 9, 2009
Decor: Knitted Poufs
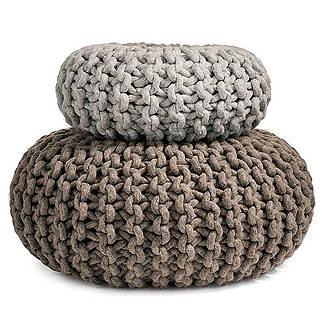
DWR
Christien Meindertsma's Flocks Pouf (2006)
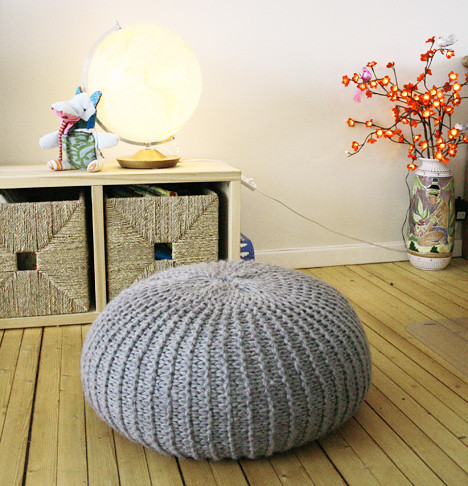
Pickles
What we used:
Eskimo, 18 balls (Or yarn suitable for US #13 needles)
Acrylic yarn would probably be a really good alternative, as it´s a piece of furniture
US #19 circular needles
2 cheap duves (feather and down)
How we did it:
Cast on 35 stitches using three threads.
Knit the garter stitch until you´ve knitted all the balls, and there is just enough yarn left to asseble the stool.
You now have ONE rectangular piece.
Cast off loosely.
Assemble the short sides (35 stitch side) as neatly as you can.
Assemble the first long side. This is supposed to be the top or the bottom of the stool. Put the needle through the end stitch of every second row and tighten, tighten, tighten! Repeat on the rows in between and tighten until there is no whole in the middle.
Stuff the duves into the stool. We tried to make a ball of the duves before we stuffed it.
Assemble the other end in the same manner as the first.
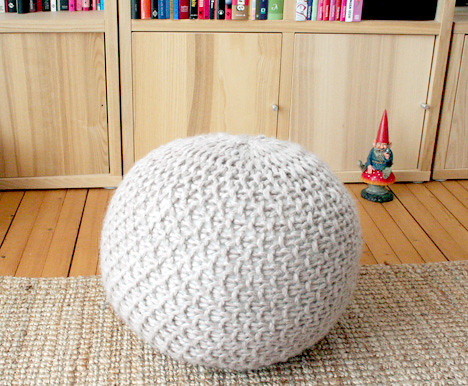
What we used
9 balls of Eskimo, or similar
A cushion from Ikea, or a cheap duvet
Circular knitting needles, 15 mm
Thick needle to assemble the stool
How we did it
Cast on 25 stitches using three threads.
Every row is knitted like this:
* K1, P1*
Repeat from * to* the throughout the row.
To create the moss stitch you simply knit over a purl and purl over a knit.
Knit all the 9 balls, but leave enough yarn for the assembly. Cast odd loosely.
Assemble the two short sides as neatly as possible.
Now assemble the bottom. Put your needle into the end stitch of every second row and tighten. Put the needle into the stitches you left out and tighten again. There´s not supposed to be a whole at all when you´re done.
Stuff your stool with a big cushion or a duvet (we preferred the last one) and repeat the assembly on the top.
Anyways, the stool is noe done!
Subscribe to:
Posts (Atom)


 Posts
Posts


